You’ve just launched a brilliant new marketing campaign. You’ve invested time, creativity, and a significant portion of your budget. The ads are live, the social media posts are buzzing, and traffic is hitting your website. But then, a nagging question emerges: Is it actually working?
Which channels are driving real conversions? Where are users dropping off? Are you getting a return on your investment, or are you just throwing money into a digital black hole? Without the right data, you’re flying blind.
This is where a proper Google Analytics integration transforms your business. It’s the bridge between raw, chaotic website traffic and the clear, actionable insights you need to grow. If your website is more than a hobby and you want to understand your website’s traffic and user behavior better, Google Analytics is a highly recommended tool. This guide will walk you through everything from the fundamentals of setting up Google Analytics 4 (GA4) to advanced strategies that turn data into your most valuable asset.
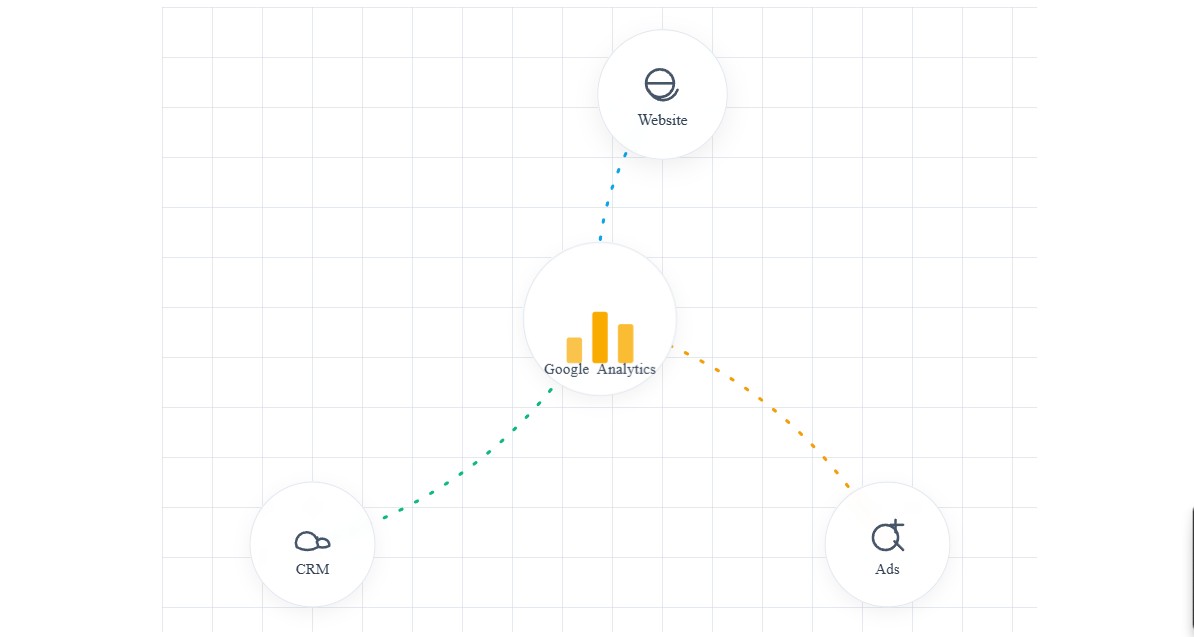
Unified Data Stream
Visualizing the flow of data from multiple sources into Google Analytics.
What is Google Analytics Integration and Why Does It Matter?
At its simplest, Google Analytics integration is the process of connecting your Google Analytics account to your website or app. But its true power lies in connecting it to your entire digital ecosystem. Think of it less as a single tool and more as a central nervous system for your marketing data.
This means linking GA4 not just to your website, but also to:
- Google Ads
- Your Customer Relationship Management (CRM) platform (like Salesforce or HubSpot)
- Your e-commerce platform (like Shopify or WooCommerce)
- Other third-party marketing and data tools
Why is this interconnected view so critical?
- A Single Source of Truth: It breaks down data silos. Instead of looking at ad performance in one platform and sales data in another, you get a unified view of the entire customer journey.
- Enhanced ROI Measurement: You can finally attribute revenue directly to specific marketing campaigns, channels, and even keywords. This allows you to double down on what works and cut what doesn’t.
- Deep Customer Understanding: Track how users who came from a Facebook ad behave differently from those who came from an organic search. See the full path from first touchpoint to final purchase and long-term loyalty.
- Smarter Audience Building: By integrating GA4 with Google Ads, you can create highly specific remarketing audiences based on user behavior on your site (e.g., users who abandoned a cart, visited a specific service page, or watched a demo video).
Without this integration, you’re only seeing fragments of the story. With it, you get the complete picture.
The Evolution: From Universal Analytics (UA) to Google Analytics 4 (GA4)
It’s impossible to discuss modern analytics without mentioning the shift from Universal Analytics (UA) to Google Analytics 4 (GA4). UA, the long-standing default, was built for a world of independent desktop web sessions. GA4 is built for today’s cross-platform, event-driven world.
The core difference is the data model:
- UA was session-based: It grouped user interactions within a specific timeframe (a “session”).
- GA4 is event-based: It treats every single interaction—a page view, a button click, a video play, a form submission—as a distinct “event.”
This event-based model is far more flexible and provides a more granular understanding of user behavior. It’s the foundation for a more powerful and insightful Google Analytics integration. If you haven’t already migrated, making the switch to GA4 is your first and most critical step.
Is Google Analytics Actually Free?
You bet—it won’t cost you a dime to get started with Google Analytics. The standard version of GA4 is available to everyone at no charge. There’s no catch, no hidden monthly fees, and no surprise invoices waiting in your inbox. Whether you’re a solo entrepreneur or running a growing business, you can tap into the full range of foundational analytics features right out of the gate.
Of course, if your brand ever expands into enterprise territory and needs bells-and-whistles like BigQuery exports, granular user controls, or custom SLAs, Google does offer a premium tier (Google Analytics 360). But for most businesses and website owners, the free GA4 package is more than enough to monitor traffic, measure ROI, and uncover actionable insights.
You can dive straight in—no credit card required, no barriers to entry.
A Step-by-Step Guide to Your First Google Analytics Integration
Ready to get your hands dirty? Let’s walk through the essential setup process.
Step 1: Setting Up Your Google Analytics 4 (GA4) Property
First, you need a place for your data to live.
- Navigate to the Google Analytics website and sign in.
- Go to the Admin section (the gear icon in the bottom left).
- In the ‘Account’ column, select the account you want to use or create a new one.
- In the ‘Property’ column, click “Create Property.”
- Enter a name for your property (e.g., “My Business Website”), select your reporting time zone and currency, and click “Next.”
- Provide your business information and objectives.
- Choose your platform (Web, Android App, or iOS App) and set up your Data Stream. For a website, you’ll enter your URL and give the stream a name.
Prerequisites: Preparing Your Google Analytics Account
Before you can integrate Google Analytics with your WordPress plugin, there are a few quick but important boxes to tick within your GA4 account:
- Create or Select an Account: Make sure you have a Google Analytics account set up. If you’re starting fresh, you’ll need to create one.
- Set Up Your GA4 Property: Follow the prompts to add a new GA4 property, choosing the right time zone, currency, and property name for your website.
- Configure a Data Stream: Add a web data stream by entering your website’s URL and giving the stream a recognizable name.
Once these steps are complete in Google Analytics, you’ll be ready to connect your tracking setup to WordPress for seamless data collection.
Step 2: Implementing the Tracking Code on Your Website
Once your property is created, GA4 will provide you with a Measurement ID (e.g., G-XXXXXXXXXX) and a tracking code (the Global Site Tag or gtag.js). You have two primary ways to add this to your site:
Method 1: Direct Installation (gtag.js) You can copy the entire gtag.js script and paste it into the <head> section of every page on your website. This is simple for basic sites but can become cumbersome and hard to manage as your tracking needs grow.
Method 2: Google Tag Manager (GTM) – The Recommended Approach Google Tag Manager is a free tool that acts as a container for all your tracking scripts (or “tags”). Instead of adding multiple scripts to your site’s code, you add the GTM container once. Then, you manage all your tags—GA4, Google Ads, Facebook Pixel, etc.—from the user-friendly GTM interface.
Why is GTM better?
- Scalability: Easily add, edit, and remove tags without touching your website’s code.
- Control: Test tags in a preview mode before deploying them.
- Performance: GTM can load tags asynchronously, which can help with site speed.
For any serious, long-term analytics strategy, GTM is the industry standard.
Setting Up GA4 with Google Tag Manager: What to Expect
If you choose Google Tag Manager, here’s a quick rundown of the steps:
- Create an account with Google Tag Manager.
After signing up, GTM will provide you with two code snippets. These need to be placed on your website—one in thehead, and one immediately after the openingbodytag—on every page you want to track. - Configure your GA4 tag within Google Tag Manager.
In the GTM dashboard, you’ll set up a new tag for Google Analytics: GA4 Configuration. Paste in your Measurement ID, and choose which pages or events to track. - Preview and publish your tags.
GTM offers a preview mode so you can test everything before it goes live. Once you’ve confirmed everything is working, publish your container.
Keep in mind, using Google Tag Manager can be a bit more technical than installing the tracking code directly. If you’re new to tag management or tracking setups, you may want to follow a step-by-step guide or seek technical help to ensure the integration is flawless.
By weighing these two methods, you can pick the approach that best fits your comfort level and future analytics needs. If you’re ready for a scalable, future-proof solution, GTM is a wise investment in your analytics stack.
Adding Google Analytics to WordPress: Plugin or Manual Code
If you’re working with WordPress, integrating Google Analytics is refreshingly straightforward—with or without touching code.
Option 1: Use a Plugin (No Code Required)
For those who prefer a code-free approach (and honestly, who can blame you?), popular plugins like MonsterInsights or Site Kit by Google handle the heavy lifting.
Here’s the drill:
- Head to your WordPress dashboard and open the Plugins section.
- Search for a plugin like “Google Site Kit” or “MonsterInsights.”
- Click “Install Now,” then “Activate.”
- Follow the plugin’s guided setup to connect your Google Analytics property. Most reputable plugins offer a walkthrough, so you’ll have tracking in place in a matter of minutes.
These plugins often unlock bonus features—think enhanced eCommerce reports, events, and custom dimensions—making them perfect for anyone who wants robust data without digging around in HTML.
Option 2: Add the GA4 Tracking Code Manually
Prefer a hands-on method? No problem. Here’s how you can add your Google Analytics tracking code directly:
- Copy your Measurement ID and tracking script from your GA4 setup.
- Install a plugin like WPCode (formerly known as Insert Headers and Footers), which lets you safely add code without editing theme files.
- Navigate to Code Snippets > Header & Footer in your WordPress admin menu.
- Paste your GA4 tracking code into the Header section.
- Hit “Save Changes” and you’re done.
That’s it! Whether you go plugin or manual, your WordPress site will start collecting data for your shiny new Google Analytics property.
A Case for Simplicity: Why Use a Google Analytics Plugin?
Now, if the thought of tinkering with website code or navigating Google Tag Manager’s many menus has you breaking into a cold sweat, there’s good news—plugins designed for popular platforms like WordPress can spare you most of the technical heavy lifting.
What makes plugins a game-changer? Instead of manually copying tracking snippets into your site or wrestling with Google Tag Manager’s interface, a plugin guides you through a few straightforward clicks. You simply install it, link your Google Analytics account, and voilà—essential tracking is up and running, often without you ever needing to touch a single line of code.
Here’s how this simplifies your life compared to manual or GTM-based setup:
- No coding required: Skip past the HTML and JavaScript. The plugin manages code insertion for you.
- Automatic updates: When Google revises its tracking code or introduces new features, plugins often handle updates behind the scenes, so you stay current with minimal fuss.
- User-friendly dashboards: Instead of switching between your website and the Google Analytics interface, you’ll often find key metrics and reports right inside your site’s dashboard—easy to access and interpret.
- One-click enhancements: Advanced tracking (like outbound link clicks, file downloads, form submissions, or custom events) can typically be enabled with a toggle, avoiding the complexity of GTM triggers and tags.
In short, plugins bridge the gap for anyone who wants robust tracking and actionable data—without needing developer skills or an afternoon lost in documentation. They’re ideal for smaller teams, site owners, or marketers who want actionable insights fast, and prefer to leave the technicalities in trusted hands.
Why Use a Plugin to Connect Google Analytics to WordPress?
Before you roll up your sleeves and dive into code snippets or advanced tag management, consider the plugin route—a secret shortcut that makes analytics easy, even if you’ve never touched a line of code.
Here’s why using a Google Analytics plugin for WordPress is a no-brainer for most site owners:
- One-Click Connection: Plugins streamline the process of linking your site to Google Analytics. Instead of pasting tracking codes into theme files (and crossing your fingers you don’t break anything), most plugins handle the heavy lifting with just a few clicks.
- No Technical Hurdles: You won’t need to wrangle with code editors, FTP clients, or Google Tag Manager containers. Plugins handle setup and future updates behind the scenes—your analytics connection keeps working even if you swap themes or make other site changes.
- Data Where You Need It: The best plugins surface your key Google Analytics data directly inside your WordPress dashboard. No more toggling between tabs or wondering where to find engagement, traffic, or eCommerce reports—they’re right where you manage your website every day.
- Access to Advanced Features: Want more than just basic page views? Plugins can enable deeper insights like event tracking, form submissions, outbound link clicks, video engagement, custom dimensions, and even eCommerce tracking—often as easily as toggling a switch.
- Save Time (and Dollars): What once demanded developer hours—or a crash course in JavaScript—is now accessible with a few settings adjustments, helping you do more without outsourcing or adding complexity.
- Automated Updates: Plugins often update tracking code formats and API integrations automatically, so you’re always compliant with the latest Google recommendations (and changes like GA4 migrations).
In short, a quality plugin brings together simplicity, flexibility, and powerful insights—making it perfect for anyone who wants advanced analytics without the technical baggage. Whether you’re running a blog, a service site, or a full-blown eCommerce shop, a plugin is your quickest path to actionable data—no developer required.
Setting Up Google Analytics on WordPress: The Plugin Approach
Not a fan of messing with code or hunting for header files? If your website runs on WordPress, there’s a much simpler way to connect Google Analytics—using a trusted plugin.
Several reputable plugins, such as Site Kit by Google or Analytify, are designed specifically to integrate Google Analytics with your WordPress site. Here’s how the plugin route streamlines your setup:
- Quick Integration, No Code Required: Once you’ve created your GA4 property through steps 1–3 above, install and activate your chosen analytics plugin from the WordPress plugin directory.
- Guided Setup: These plugins typically offer a user-friendly wizard. Simply authorize access to your Google account and select the GA4 property you’d like to connect. The plugin handles the technical detail—no need to paste scripts or fumble with theme files.
- Instant Insights in Your Dashboard: View key metrics, real-time users, traffic sources, or even eCommerce data without ever switching tabs. Many plugins surface these reports directly in your WordPress dashboard—no more hopping between multiple tools.
- Advanced Features with a Click: From event tracking (form submissions, file downloads, outbound links) to enhanced eCommerce tracking, plugins often unlock deeper insights with minimal configuration. Some will even auto-detect and track video plays, scroll depth, or custom dimensions.
- Ideal for Growing Sites: As your WordPress site evolves, plugins make it painless to expand your analytics setup—whether you want to track authors, categories, or set up custom goals.
Bottom line: If you want a hassle-free, code-free integration—and instant access to your most important analytics right where you manage your site—a plugin is the way to go.
Once your plugin is connected and data starts flowing, you’re ready to verify your setup and dive into the insights Google Analytics brings to your WordPress site.
No Coding Required: The WordPress Plugin Advantage
Not comfortable editing code? Good news—integrating Google Analytics with WordPress doesn’t require a single line of it. Thanks to top-rated plugins like GA Google Analytics and Site Kit by Google, you can connect your site to Google Analytics in just a few clicks.
Here’s how user-friendly these plugins make the process:
- Effortless Setup: Instead of tinkering with files or scripts, you simply install the plugin, authenticate with your Google account, and paste in your Measurement ID—no tech wizardry needed.
- Streamlined Reporting: Once connected, you can view key metrics right inside your WordPress dashboard. No more toggling between platforms unless you want to dive deeper.
- Advanced Features Unlocked: Many plugins let you enable features like event tracking (button clicks, form submissions), outbound link tracking, enhanced eCommerce reporting, and custom dimensions—all from an intuitive, checkbox-filled settings page.
- No Developer, No Problem: What used to take hours (and potentially a developer’s hourly rate) is now a DIY project you can complete over coffee.
In short, whether you’re running a blog, portfolio, or a full online store, a well-supported plugin takes the heavy lifting—and confusion—out of integrating Google Analytics with your WordPress site.
Pros and Cons: header.php vs. functions.php for WordPress Tracking
You might be wondering: Should you drop your Google Analytics tracking code into your site’s header.php file, or should you wire it up using the theme’s functions.php file? Both are classic WordPress approaches, but each comes with its own set of trade-offs. Let’s break them down:
Adding to header.php
Pros:
- Simplicity: It’s a straight copy-and-paste job—open
header.php, place your snippet right after theheadtag, save, and you’re off to the races. - Direct Placement: You have full control over exactly where the script appears, which is handy for troubleshooting or stacking additional tracking codes in sequence.
Cons:
- Theme Volatility: If you switch themes or update your theme files, you’ll lose your code. That means you’ll need to remember to re-add it every time you make a change—a tedious (and forgettable) maintenance task.
- Manual Upkeep: Any adjustments or updates require you to get your hands dirty with theme file edits each and every time.
Adding via functions.php
Pros:
- Automatic Insertion: By using a function (often hooked to
wp_head), you ensure your tracking code appears on every page regardless of individual template files. - Centralization: Managing scripts in
functions.phpcan be tidier, especially if you’re rolling out multiple snippets or tweaks as your site grows.
Cons:
- Still Tied to Theme: Like
header.php, switching or updating themes wipes out your changes—unless you’re using a child theme or custom plugin. - Slightly More Technical: You’ll need to wrap your code in proper PHP functions and hooks—nothing too complex for anyone comfortable with a little code, but not as cut-and-dry as a copy-and-paste.
Bottom line: Both methods work, but both are vulnerable to the classic “Oops, I changed my theme!” headache. If you favor a more permanent, future-proof approach, consider placing your tracking code with Google Tag Manager or creating a site-specific plugin. But if you’re sticking to the theme files, just remember to keep backups handy.
Step 3: Verifying Your Installation
How do you know it’s working? The moment of truth!
How to Add the GA4 Tracking Code Directly to Your WordPress Theme
If you’re a bit more hands-on and prefer rolling up your sleeves, you can embed your Google Analytics tracking code directly into your WordPress theme files. Be aware, though: this approach is best for those comfortable with code edits, and it comes with a caveat. If you ever switch or update your theme, you’ll need to repeat this process—so keep track!
There are two main routes:
1. Inserting Into header.php
- Open your current theme’s
header.phpfile. - Locate the opening
headtag. - Paste your GA4
gtag.jstracking code just after this tag. - Save your changes and, if using FTP or a file manager, re-upload
header.phpto your server.
This ensures your tracking code loads within the head section of every page.
2. Using the functions.php File
Want a set-it-and-forget-it option? Add the code via your theme’s functions.php file:
- Open your theme’s
functions.phpfile. - Insert a snippet that dynamically injects the GA4 tracking code into the
headsection across the site. - Replace any placeholder with your actual Measurement ID or tracking script.
This method is clean and automatic—your code appears on every page, without manual edits to multiple files.
Which Should You Choose?
Pick one method—never both. For most DIY site owners, editing header.php is usually quicker, but the functions.php route is tidier in the long run. And remember: whenever you update or switch themes, recheck your tracking code!
Now, let’s make sure it’s working as expected.
Step 3: Verifying Your Installation
How do you know it’s working? The moment of truth!
After implementing your tracking code, go back to your GA4 property and navigate to Reports > Realtime. Open your website in a separate browser tab and start clicking around. Within a minute, you should see your own activity appear in the Realtime report. You’ll see which pages you’re visiting and the events being triggered.
If you see data flowing, congratulations! Your basic Google Analytics integration is complete.
What If You Don’t See Data Right Away?
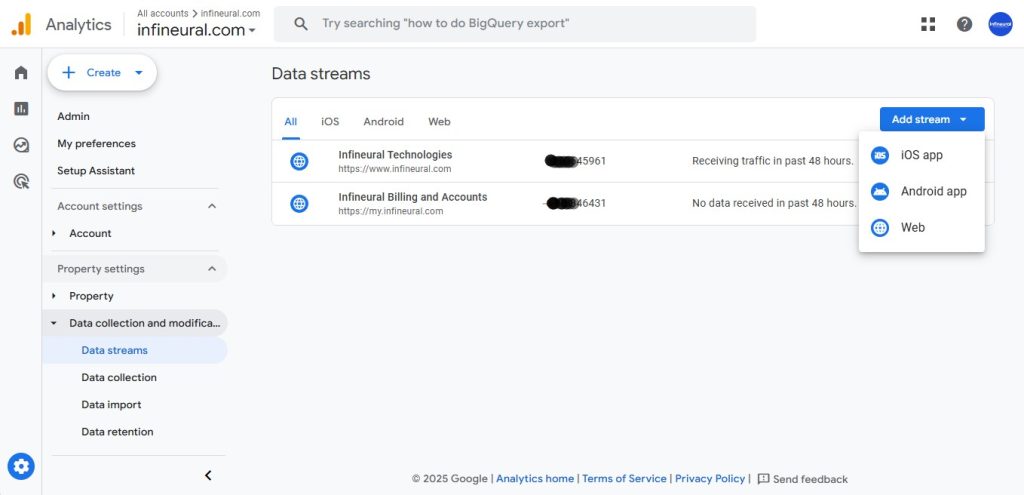
Sometimes, it takes a little while for data to start appearing. Give it 15 to 30 minutes and check again. You can also head over to the Data Streams page in your GA4 property—look for the message that says “Receiving traffic in the past 48 hours.” This confirms that data is coming through.
Keep in mind that it may take Google up to 24–48 hours to populate all your reports with complete data. So if things look a bit quiet at first, don’t worry—Google Analytics is still gathering information in the background.
If you still don’t see any data after waiting, double-check your tracking setup and try your preferred method again. Still no luck? At that point, it may be worth reaching out to Google support for help.
How Soon Can You See Your First Reports?
The best part? Once you’ve set up your GA4 property and added the tracking code (either manually or with a plugin), you’ll start seeing real data almost instantly—usually within just a few minutes. No need to wait hours or dig through complicated menus.
Just refresh your WordPress dashboard, and the latest insights will be right at your fingertips, letting you monitor your website’s performance from day one.
Beyond the Basics: Integrating GA4 with Your Essential Tools
The initial setup is just the beginning. The real value is unlocked when you connect GA4 to the other tools that run your business.
Integrating Google Analytics with Google Ads
This is non-negotiable for anyone running Google Ads. Linking these two platforms allows you to:
- Import GA4 conversions (like
form_submissionorpurchase) directly into Google Ads as conversion goals. - See detailed website engagement metrics (like engaged sessions and bounce rate) for your campaigns right inside the Google Ads interface.
- Build powerful remarketing lists in GA4 to target users in Google Ads based on their precise on-site behavior.
The linking process is straightforward and can be initiated from either the GA4 or Google Ads admin panel. Google’s official guide to linking Ads and Analytics
Connecting GA4 to Your CRM (e.g., Salesforce, HubSpot)
This is where many businesses hit a wall, but it’s also where the most profound insights are found. Integrating GA4 with your CRM connects pre-sale web behavior with post-sale customer data. You can answer questions like:
- Which marketing channels bring in the customers with the highest lifetime value (LTV)?
- What on-site actions did our most successful enterprise clients take before they contacted sales?
- How does website engagement correlate with lead quality and deal-close rates?
While some CRMs offer native connectors, achieving a truly seamless and reliable data pipeline often requires custom development to handle data mapping, cleansing, and validation. For this level of mission-critical integration, businesses often rely on experts. At Infineural Technologies, we specialize in building robust, custom data bridges between GA4 and your CRM, ensuring your sales and marketing teams are operating with a perfectly unified dataset.
E-commerce Platform Integration (Shopify, WooCommerce)
If you run an online store, integrating GA4 with your e-commerce platform is essential. This allows you to track the entire shopping funnel automatically:
view_itemadd_to_cartbegin_checkoutpurchase
Most major platforms like Shopify have built-in or plugin-based integrations that simplify this process, pushing rich e-commerce data directly into GA4.
Adding Google Analytics to Other website Platforms
If you’re using a platform outside of WordPress—such as WIX, Shopify, or a custom solution—the steps are slightly different, but the core concept remains the same: you need to get your Google Analytics tracking code from your GA4 account and add it to your website’s header.
Here’s how to approach it:
- Copy your GA4 tracking code from your Analytics property.
- Locate your website’s code injection area: Platforms like WIX provide a site editor for adding code snippets, while Shopify allows direct editing of your site’s HTML and theme files. Look for an option in your website builder’s settings or dashboard to add custom code to your global header.
- Paste the tracking code into the global header section so it loads on every page of your website.
- Save your changes to ensure the code is active across your site.
Once complete, your GA4 property will start receiving data from every page—laying the groundwork for robust analytics, regardless of which platform you use.
eCommerce Tracking: Plugin Simplicity vs. Traditional GA Setup
Back in the day, setting up detailed eCommerce tracking in Google Analytics—especially for platforms like WooCommerce—was no small feat. You’d often find yourself tinkering with code, mapping custom events, or pulling a developer into the mix. Relying on Google Tag Manager (GTM) was standard, but the endless configuration steps meant even “tech-savvy” business owners were in over their heads.
Fast forward to today: eCommerce plugins have largely removed the pain. Rather than slogging through code snippets and data layer variables, modern tools let you enable advanced sales and product tracking with just a toggle—no developer required.
What’s the real-world impact? You get instant visibility into key metrics, such as:
- Conversion rates at each stage of the checkout funnel
- Best-selling products and average order values
- Cart abandonment trends
In other words, businesses can quickly access meaningful insights—without diving into a technical rabbit hole or risking a misconfigured setup. For most online stores, choosing a plugin-based approach over old-school custom GA installs saves time, reduces errors, and frees up resources for what matters most: growing your sales.
Who Should Use a Google Analytics Plugin?
So, who actually benefits from integrating Google Analytics via a plugin? In short: any WordPress-powered website that values convenience and actionable insights—without wanting to mess around with code or become a Google Tag Manager power user.
Ideal Candidates for Analytics Plugins
- Small Business Websites: Owners who want quick visibility into web performance and marketing ROI—directly from their WordPress dashboard—without a steep learning curve.
- E-commerce Stores (Shopify, WooCommerce, etc.): Online retailers who need e-commerce tracking, conversion insights, and easy-to-understand sales reports. Plugins let you monitor product performance, average order value, and transaction funnels with just a few clicks.
- Blogs and Publishers: Creators who want to track visitor behavior, top-performing content, author stats, and outbound link performance—without getting lost in complex GA4 configurations.
- Membership and Course Sites: Platforms running on WordPress (using plugins like MemberPress or LearnDash) that require simple event and user engagement tracking, including signups, completions, and member activity.
- Nonprofits and Service Providers: Organizations who need form conversion tracking or media (e.g., video) engagement metrics, but don’t have dedicated analytics resources.
In essence, plugins are a massive time-saver for anyone who wants to unlock the power of Google Analytics in their WordPress site, but prefers to avoid custom code or consultant-level technical setups. You get advanced tracking, streamlined reports, and essential business metrics at your fingertips—no developer required.
Activating Advanced Tracking in WordPress with a Google Analytics Plugin
A robust Google Analytics plugin for WordPress can unlock a host of advanced insights with just a few clicks—no manual code adjustments needed. Once enabled, you gain access to powerful tracking features such as:
- Monitoring form submissions, so you know exactly which forms drive leads or inquiries.
- Capturing custom events—like button clicks, downloads, or video views—to see how visitors interact with your site beyond just page views.
- Tracking outbound link clicks to reveal which external destinations are drawing your audience’s attention.
- Analyzing author-specific performance, revealing which contributors generate the most engagement or drive traffic.
- Seamlessly pulling in enhanced e-commerce data from platforms like WooCommerce, enabling granular funnel and transaction tracking.
- Setting up custom dimensions for tailored reporting—think user roles, post categories, or logged-in status.
With these features activated, you’ll have a much clearer—and more actionable—picture of user behavior across your WordPress site.
Viewing Analytics Data Directly in WordPress
Once your Google Analytics plugin is installed, your WordPress dashboard transforms into a data command center. Here’s a taste of the actionable insights you’ll have at your fingertips—no extra tabs required:
- Real-time Activity: Watch visitors arrive and interact with your site as it happens, seeing which pages or posts are getting attention right now.
- E-commerce Performance: Track sales, revenue, conversion rates, and your top-performing products if you’re running WooCommerce, Shopify, or similar platforms.
- Site Speed Reports: Quickly identify load time issues that might be causing visitors to bounce before they even see your content.
- Search Console Integration: Discover the actual search queries bringing people to your site, and measure how well your content ranks over time.
- Media Engagement: See which videos and other embedded media are capturing your audience’s interest.
- Behavior Flows and Top Content: Pinpoint your most popular blog posts, landing pages, and user journeys throughout your site.
With these reporting features built right into WordPress, you’ll spend less time digging through external dashboards—and more time making strategic moves based on what’s actually happening across your digital storefront.
Common Pitfalls in Google Analytics Integration (And How to Avoid Them)
A flawed setup can be worse than no setup at all because it leads to bad decisions based on bad data. Here are the most common mistakes:
- Polluting Data with Internal Traffic: Your own employees visiting the website can skew your data. Always create a data filter in GA4 to exclude traffic from your office IP addresses.
- Forgetting Cross-Domain Tracking: If your user journey spans multiple domains (e.g.,
mybusiness.comtocheckout.mybusiness-portal.com), you must set up cross-domain tracking. Otherwise, GA4 will see a user moving between sites as two separate users, breaking the journey. - Not Defining Conversions: GA4 tracks events, but it doesn’t know which ones are most important to you until you tell it. Go to Admin > Conversions and toggle on the key events (like
purchaseorgenerate_lead) that signify a business goal has been met. - Inconsistent Tagging (The Double-Tracking Menace): This often happens during a migration. A team might install GA4 via Google Tag Manager but forget to remove an old, hardcoded analytics tag from the website’s code. This results in every action being tracked twice, inflating your traffic and event counts.
Supercharge Your Insights with Advanced Integration Strategies
Once your foundation is solid, you can elevate your analytics to a new level. The true power of a modern Google Analytics integration lies in its connection to the wider Google Cloud ecosystem.
- Server-Side Tagging: For ultimate data accuracy and control in a world of ad-blockers and privacy restrictions, server-side tagging (via GTM) sends data from your server to GA4, rather than from the user’s browser. This creates a more reliable and secure data stream.
- The BigQuery Integration: This is GA4’s superpower. With a few clicks, you can link your GA4 property to Google BigQuery, a powerful data warehouse. This allows you to export your raw, unsampled event-level data and run sophisticated SQL queries, join it with other business data, and build predictive machine learning models.
- Custom Data Dashboards: While the GA4 interface is powerful, building custom dashboards in a tool like Looker Studio (formerly Google Data Studio) allows you to visualize the KPIs that matter most to your business, pulling data from GA4, Google Ads, your CRM, and more into a single, unified view.
These advanced strategies are where data becomes a true competitive moat. The team at Infineural Technologies helps businesses design and implement these sophisticated data ecosystems, transforming your GA4 data from a simple reporting tool into a predictive engine for growth.
Your Data Is Your Future
A successful Google Analytics integration is no longer a “nice to have” for digital businesses; it is the fundamental requirement for sustainable growth. It’s the difference between guessing and knowing, between reacting and strategizing.
By properly setting up GA4, connecting it to your critical business platforms, and avoiding common pitfalls, you create a source of truth that empowers every decision you make. You can finally understand your customers, prove your marketing ROI, and confidently invest in the strategies that drive results.
The journey starts with a single, properly placed tag, but it leads to a complete transformation in how you see your business and its potential.
Ready to transform your data from a confusing stream into a strategic asset? If you want to ensure your Google Analytics integration is built for performance and scale, talk to an Infineural Technologies expert today for a free consultation Contact Us.